
A week ago I found that one of the WordPress sites (Web App) I was hosting in one of my Azure subscriptions stopped to work. It was giving a database connection error.
After clicking through a bit more so I would get the actual error I had something like this:
We were able to connect to the database server (which means your username and password is okay) but not able to select the lekshouAKsaLXNoT database.
From here it was a bit difficult to determine what to do. There were a few forum posts of people experiencing the same since a few days. Some of them gave up and started to build a new website. Others were still down. No real good answers. There were also posts about cases where there were MySQL databases hosted in Azure in a ClearDB configuration. If that was the case and if those databases were hosted on ClearDB within a low application tier, it would mean they would get disabled and wait until a higher plan was chosen and paid for. This was due to Azure placing those databases on the ClearDB platform and there being a change in policy whereby now ClearDB would charge the costs directly to customers instead of Microsoft.
However, when looking in my Azure portal I had only a Web App. There is a database behind it, but it is not selectable as a separate object in the portal. So I could not see its properties and location and application tier/plan.
Contacted both Azure Support and later ClearDB support to find out where the database was at least.
It turns out it was at ClearDB and was locked due to indeed being in a lower plan.
Now this is about a charity website for House of Tails dog shelters, So I need to keep costs down and want to keep everything in the Azure subscription credits and not in a third party payment module. At first I got the message that I needed to do the Transition Wizard and move the database to a higher payment plan and it would be online. Would only be 10 USD per month by the way for the Venus plan (the now lowest plan which works). Keep reading below for this option as it is very simple! But in the end I got some extra advice which helped me achieve my goals. Goals being:
- Keep everything in Azure including payments/credits
- Get it online
- At least costs
So here goes both procedures to get my site (and yours) online:
- Use the transition wizard mentioned here: http://w2.cleardb.net/important-change-of-billing-notice-for-all-azure-cleardb-service-plans/ and from there have an account created and its possible to upgrade the database(s) to at least Venus subscription at 10 USD per month.
- Or, run the same transition wizard to create your account at ClearDB, and do NOT upgrade the database to a higher plan with all the prompts to do so.
- It will ask to confirm a creditcard. You can do that to activate the confirmation. It should be a 1 USD transaction to confirm it exists and gets given back again.
- You see a list of your databases in their cleardb portal now. And your database probably is Red and locked and prompts again to upgrade it. Ignore those prompts, they come often.
- Click the database.
- Go to the Backups & Jobs tab.
- Start a new backup. wait 5 minutes.
- Go back to the tab and it should list one or more backups of your database.
- Now you can use the Export option to be able to download a .sql file containing your data.
- Next you can import this data into another place where you have mysql running.
SO what I did was go back to the WordPress Web App I have in the Azure Portal.
- Go to the App Services, find the Web App and go to its settings
- Scroll down to “MySQL In App”
- I changed the setting to On. This sets up a local MySQL instance in the VM running the web app. Keep in mind their warnings that this is not for production setups and speeds (high volume or high availability are not with this option).
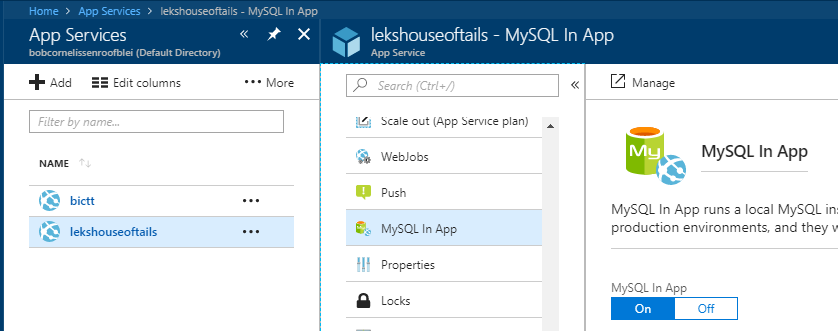
- Look at the above picture. First part are the App Services Web Apps. Second column shows the MySQL In App settings. Third column shows the option to turn on to get a local MySQL running. See the Manage button above it? Click that.
- This opens a phpmyadmin for your local install and gives you possibilities to do stuff on the MySQL instance.
- Now I made some mistakes at this point, so read this before making the same ones. Else nothing will work.
- Do NOT make new accounts. It will break stuff.
- Do NOT make a new database. It will break stuff.
- Use the existing “localdb” database which is empty now. Click it on the left hand side. Now in the menu in the middle of the screen click the Import button.
- Select File and get your .sql file you got from the export you made from the other database. This will get the contents in there in the localdb database.
Now the next step in this case is to make the WordPress side work again with this new database in other location. In order to do that we need to re-point it to the new database and so on. Now the two methods are quite different as it turns out. What we need to do is edit the wp-config.php file.
- Open up the Diagnostic console for your site. Go to in my case https://yourwebsite.scm.azurewebsites.net/DebugConsole and obviously change that first part (yourwebsite) to whatever you use as the web app name.
- You will find the DebugConsole – CMD
- Now this showed me a directory listing in the middle of the screen with a command prompt screen below it.
- Click into the folder structure or use the cd command. Go to: Sites – wwwroot
- Find the wp-config.php file
- There is an Edit button right to the left of the file.
Now if you are like me and had one way of connecting to the database and now need a new way to connect this is going to look strange. The initial version I had was clearly pointing at a server host and database name and user name and password. Also there were Authentication Keys and Salts there in a list. I was fortunate that the other web app I had was created right away with the local MySQL version, so I had an example of what it would look like. I kept the Keys and Salts section intact because they were created to connect to the database and contents and the content would be the same now after the import. I have used a double forward slash to comment out the old values of user names and database names, so I would still have them.
Now the piece of code I injected into the file before Saving it and Restarting the Web App from Azure Portal:
| $connectstr_dbhost = ”; $connectstr_dbname = ”; $connectstr_dbusername = ”; $connectstr_dbpassword = ”;foreach ($_SERVER as $key => $value) { if (strpos($key, “MYSQLCONNSTR_”) !== 0) { continue; } $connectstr_dbhost = preg_replace(“/^.*Data Source=(.+?);.*$/”, “\\1”, $value); $connectstr_dbname = preg_replace(“/^.*Database=(.+?);.*$/”, “\\1”, $value); $connectstr_dbusername = preg_replace(“/^.*User Id=(.+?);.*$/”, “\\1”, $value); $connectstr_dbpassword = preg_replace(“/^.*Password=(.+?)$/”, “\\1″, $value); } // ** MySQL settings – You can get this info from your web host ** // /** The name of the database for WordPress */ define(‘DB_NAME’, $connectstr_dbname); /** MySQL database username */ define(‘DB_USER’, $connectstr_dbusername); /** MySQL database password */ define(‘DB_PASSWORD’, $connectstr_dbpassword); /** MySQL hostname */ define(‘DB_HOST’, $connectstr_dbhost); /** Database Charset to use in creating database tables. */ define(‘DB_CHARSET’, ‘utf8’); /** The Database Collate type. Don’t change this if in doubt. */ define(‘DB_COLLATE’, ”); |
So, like I said, Save the file. Go to Azure Portal, find the web app and select the Restart option.
In my case it worked again after this.
After I corrected my mistakes of creating another database and other users in the MySQL instance. It is simply not supported in this setup. And will break it if you do.
Of course another way would be to create an Azure database resource of a MySQL database and use that to connect to it. Might require the old way of doing things with user name and password.
Reference: My MSDN ticket for the issue.
So the Website was up again, the database was now again part of Azure and the payments within Azure, where I wanted it to be in the first place anyway.
Good luck if you run into something similar. Only took me to 4 AM to get back online.
Bob Cornelissen