

In this post in the SCOM Reporting blog post series we will show you how to schedule a report, so you can get a report delivered to you or your manager every month in for example an email.
The assumption here is that you have opened a report, filled in the required fields like time-range and objects and successfully ran the report. You now have a report in front of you with data. In general you would first save this report or publish it first. From there you can run it again and Schedule it.
In this case I take that report which I saved to a management pack from my previous blog post about Saving reports for later runs. I run it and wait for the data to appear.
In the top menu click File and select Schedule…

You can also right-click a report from the reports list and select Schedule from there.
Next you will end up at a wizard where you need to select the delivery method. This could be a File share or e-mail. Lets select e-mail and continue filling in some fields:
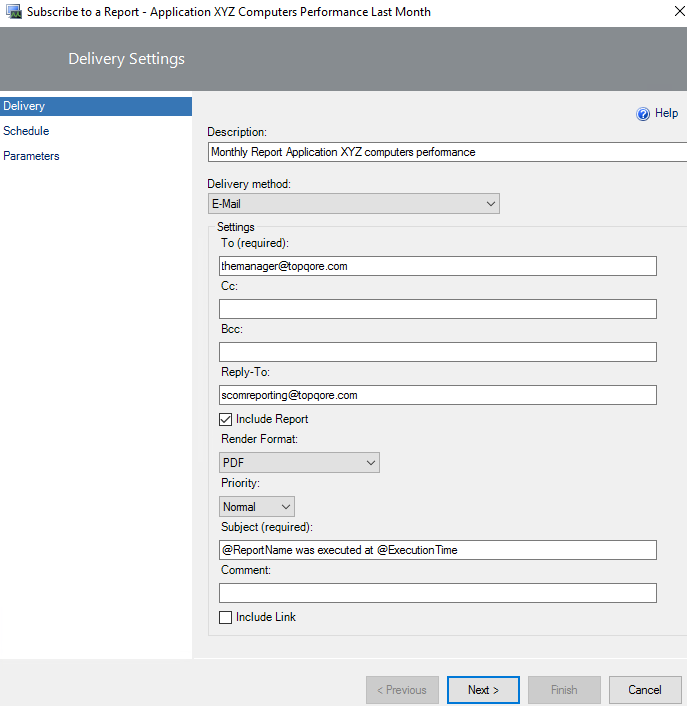
In this case of course I started with a description so I know what this is.
Next I selected the delivery method = e-mail
This opens up more options in the wizard.
I specified the manager I want this report delivered to (it doesn’t exist, just an example!) and the reply-to address I also made up. It is nice if that field is always the same so you know where it comes from. Some email bridgeheads also require it for emails appearing to come from inside the network.
I opted to include the report and selected from the drop-down list PDF this time.
As you can see below it it will generate an email subject based on the report name and the time it was run.
I de-selected the Include Link option there, because this manager does not have SCOM console access and will just get this report in the email as the PDF attachment.
Click Next. This brings us to the Schedule tab:
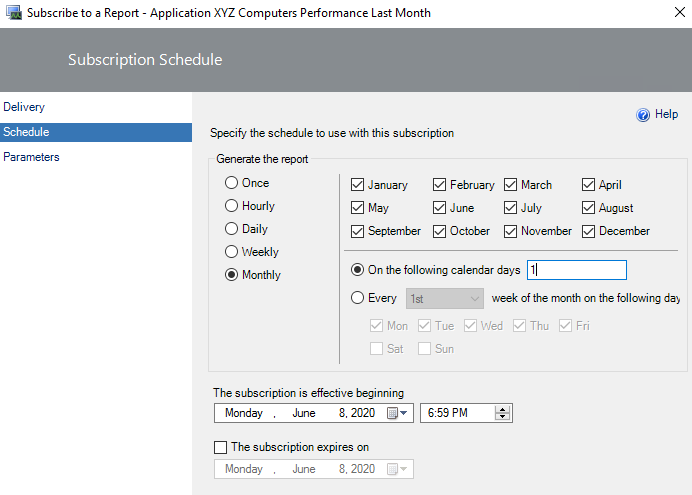
Again there are several options here for scheduling. I selected Monthly and from there I got the months selected and I get a choice to select the calendar days and selected the 1 of every month. You can see multiple options exist also for weeks and to send only on weekdays and so on. We can set a starting date and an end date if applicable. Click Next.
You will see the Parameters tab. This got filled by the last run and if that was good you can just move on from here. Otherwise adjust as needed. It is just easier to do it first in the report and next schedule it so you can ignore this screen. Click Finish.
After a while the report will be scheduled.
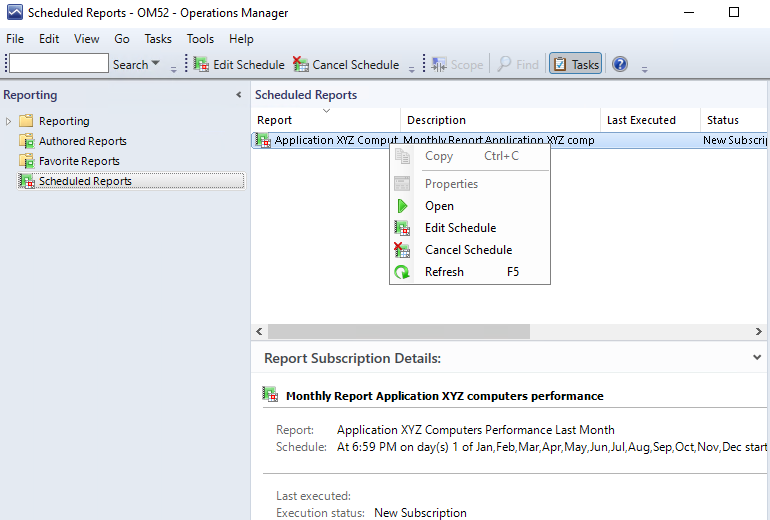
In the SCOM Reporting pane you can scroll down the left hand menu to Scheduled Reports and find your scheduled report in the middle pane.
From there you can either run it by clicking Open, or Edit the schedule or Cancel the schedule.
In this blog post we showed you how to get from a report you ran to a scheduled report, which can run automatically on a time schedule and deliver a report by file share or email in one of the supported rendering formats (such as PDF in this example).
Keep in mind that for successful sending of e-mail the SQL Reporting Services configuration must be edited to configure what e-mail server it should use and any authentication methods. Also a email bridgehead may need to have it added in the allow list to allow email coming from this server. For File Shares you also might need to configure settings for it to have a file share to write to and authentication.
Back to the master list: SCOM Reporting series – Home and What is SCOM Reporting
Comments are closed.