
Recently I received a request to be able to monitor all Windows Services running under a specific user account (service account) one certain machines, and to bring them together in a overview. I will show you how I did this.
This blog post will show you a complete way to monitor a list of services running using the same account.
I will show you at the bottom of the post how to monitor a list of services with a similar name (which is just a few words different from this whole story).
First of all we have of course multiple ways to monitor services as I have explained in a blog post series about the subject: SCOM – Monitoring a Service – Part 1 intro. However all of this is geared towards monitoring a single service on a single machine or a group of machines for instance.
But sometimes I get requests to:
- Monitor multiple services with somewhat similar names (for instance “System Center *”).
- Monitor multiple services running under a certain account.
- Alert if any service on any server is running using a certain account (which they dont want).
The first item has been blogged about years ago. The second one is what I was asked to do in this case, so I will pick that one up first. And the last one is something we did in a completely diffeent manner and I might blog about that as well later if you like that (the question was actually not nonly for Windows Services, but also for Windows Scheduled Tasks). I will get back to that in a minute.
The next thing is to bring these items for the first two bullets together in a dashboard or console. As example in the case I ran into at a certain customer the easy way would be to open up a Savision Live Map and add them through an automatic population rule. That way they are of course added to a group and are visible and have a rollup, all happy. In this case we were limited in the amount of maps we could use. So a next likely alternative is to create a distributed application (DA) in SCOM. From there we can add the found services into the DA’s. Problem is this does not populate automatically by default. But we can change that behavior to enable automatic population of items on a DA. Think it is best to put that in a separate post how to do that. But the idea was to: find these services + monitor them + put them in a DA + automatically. So also if a service gets added which uses the same criteria it should automatically be brought into monitoring and should be added to the DA! And in his specific case we added the resulting DA’s as items on an existing Live Map dashboard.
You know what, I can blog about all these things :p B) These kind of workarounds are not always easy to find, and sometimes it is an adjustment of what has been described by one or two people before.
Lets start
We need to have a discovery and monitoring of Windows Services running on a certain machine, for all services which are using the same service account. And we also wanted to do this for both Automatic and Manual services.
Now we need to create a similar use case to do this blog post with. Lets go and find all Windows Services on the SCOM management server using the SDK service account (On my test machine im running a few services with that account to make it easy for me).
I will write this down mostly step by step and expect a little knowledge on how to do stuff in the SCOM Console and there will be XML editting involved, but still no crazy stuff. :crazy:
Let’s do this! :))
I am going to use a method posted about by Brian Wren wayyyyy back in 2008 for using wildcards with the Windows Service template, and adjust it to my needs. By the way the method in the post mentioned is the way to monitor multiple services with a similar name and a wildcard, using the same template as we use below. Lucky we can keep using the same methods as before and even modify them for other similar needs!
I want to have a new fresh management pack, and I want to have a group of servers to target this service monitoring to. So I start with creating a New Group in SCOM and meanwhile when it asks me where I want to save it I will have it create a New Management Pack for me.
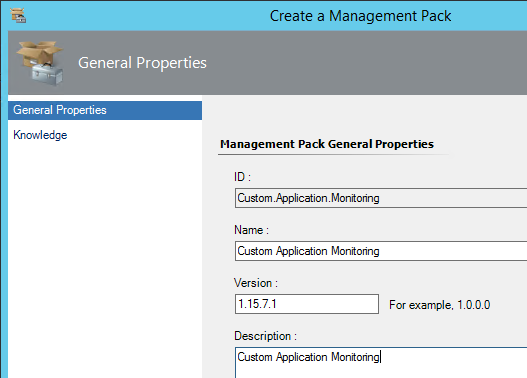
The name is easy to recognize and I am using a versioning format as 1.year.month.anumber. This way with the year and month placed there when I create updates to a pack it is always a higher version than the last time I editted it (if it is in the same month I just move the last digit up a version number). Just one of the things I use for a versioning strategy.
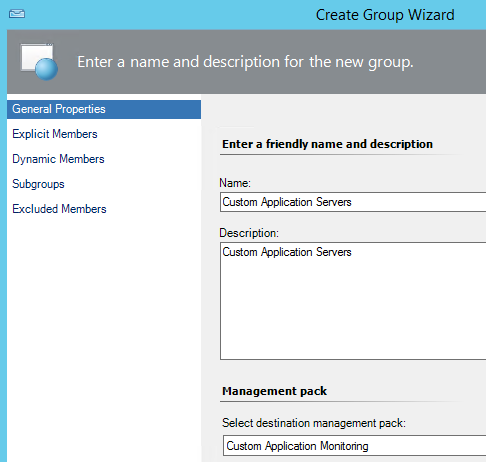
And now we have a group in the same management pack. From this point I walk through the wizard for the group and just add the SCOM Management server to it. So this is my group of servers where I want to monitor the services on.
Moving on, now we will go to the Authoring pane in the SCOM console.
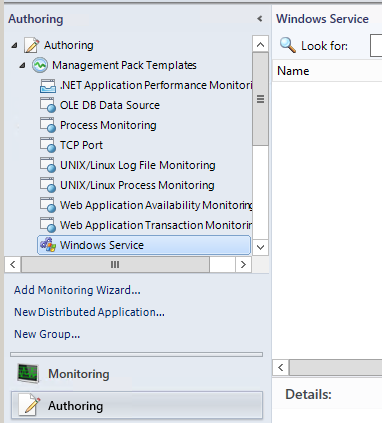
In the Authoring pane find the Management pack templates -> Windows Service. Click the Add Monitoring Wizard. Select Windows Service to start the correct wizard.
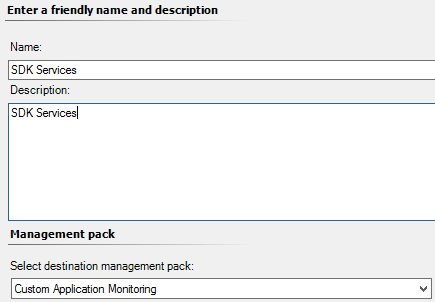
Enter a name and description and of course place this in the newly created management pack.
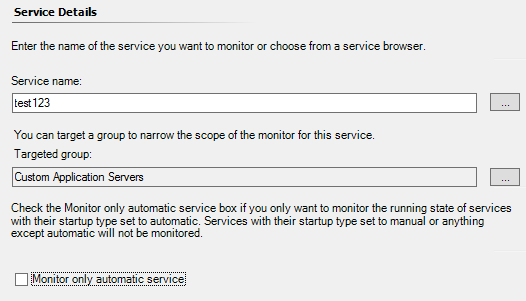
Now on the Service Details page we enter a temporary service name. We will change this later, but we need to have something we can find back quickly enough. So I entered test123 as service name. Next we select the targeted group, which is the group we created earlier and contains the application servers. Because we want to monitor these services both when they are in automatic state and manual startup state we de-select the checkbox at “Monitor only automatic service”. I am not that interested in performance data for each service so I just walk through the rest of the wizard in a Next Next Next Finish kind of way.
So now we have a service monitor created in the new management pack and targetted at a group of servers.
Now go to the SCOM Admin pane and go to the Management Packs list. Find this management pack and export it to for instance the desktop.
First we need to do something else before we start editting the code within the exported XML of the management pack.
Now the default Windows Service monitoring template uses a different method to find the specific service (discover it!) than we would use to collect several services in one query. FOr this we want to use WMI to query windows for all the services we are interested in and put that in the Discovery item in the management pack we just created. For this to work of course we first need to find the correct WMI query and test if this gives us the desired result. For this we can use a tool already installed on your machine.
Go to the server where there are these different services running using the same service account. Open a command prompt. Type wbemtest and press enter.
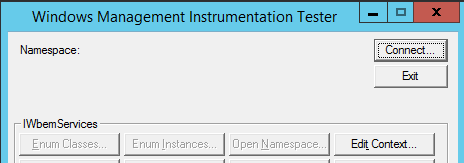
Press the Connect button, make sure it says “rootcimv2” near the top and press Connect button again.
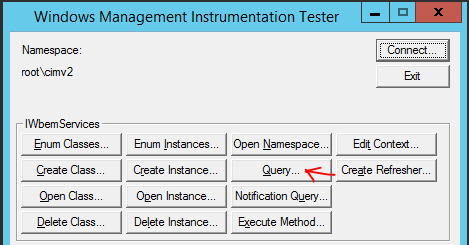
We should now be connected and all the buttons enabled. Find the Query button and click it.
Now the trick is to make the right query to get your data returned to you. In my case I had to search a little bit. Also because I wanted to have the extra filter not only for account name but also wanting to see manual and automatically starting services.
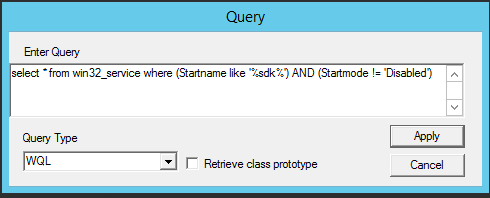
select * from win32_service where (Startname like ‘%sdk%’) AND (Startmode != ‘Disabled’)
I came up with that query. So what does it do. Well it requests the list of windows services and filters it (where) to find any service with a Startname containing sdk. The percent % signs around it are the wildcards. In WMI they use a percent sign as wildcard and not the star. And I added a second filter where I filtered out all disabled services. That should give me what I want. Lets run the query by clicking the Apply button.
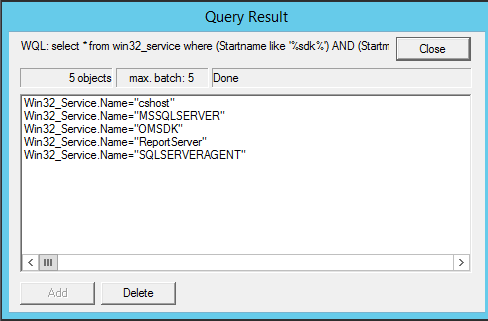
Alright. These are the internal names for the services and indeed there are two SCOM related services and 3 SQL related services which are running with an account with “sdk” in the name somewhere. So after some playing and trying to find how to write WMI queries we finally have a query which will return what we want. Now please copy the query somewhere, so we can use this later.
Now the management pack Authoring part! We will now edit the XML of the management pack we saved earlier. You can do this in any editor and even in Notepad, but I suggest to use at least an editor with some code highlighting. For instance I use Notepad++ for this.
And of course I found out that I did not have it installed on this test server, so I downloaded it (free !) and installed it.
Open up the XML file in the preferred tekst editor. We want to find the Discovery for our custom service we created. So find “test123” and you will have found the discovery.
This looks like a lot of stuff and to some it is not Always too clear what it all means, but stay with me. I will highlight the pieces of code within this block we want to change:
I am sorry to report that this blogging software messes up the XML code blocks and the codeblock option makes it unreadable. So I put the whole thing in MS Word and made two screenshots of the whole discovery. The red parts of the code is what we are looking for (in three places).
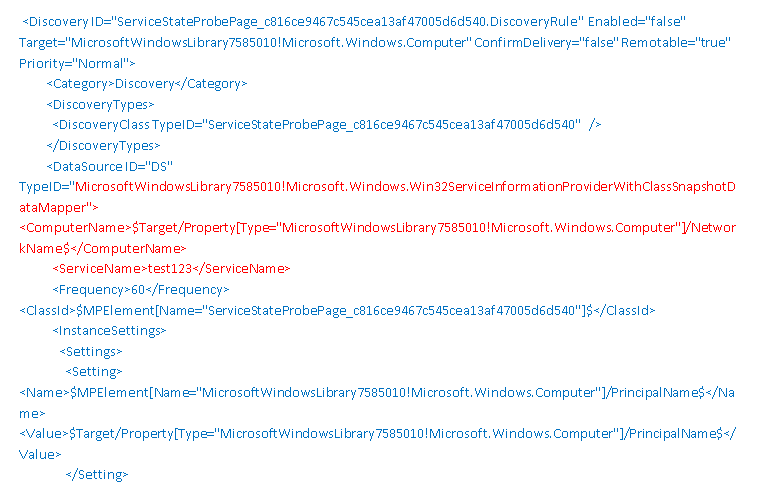
We are going to replace the first red part with:

(I left the Frequency tag in there so you recognize it).
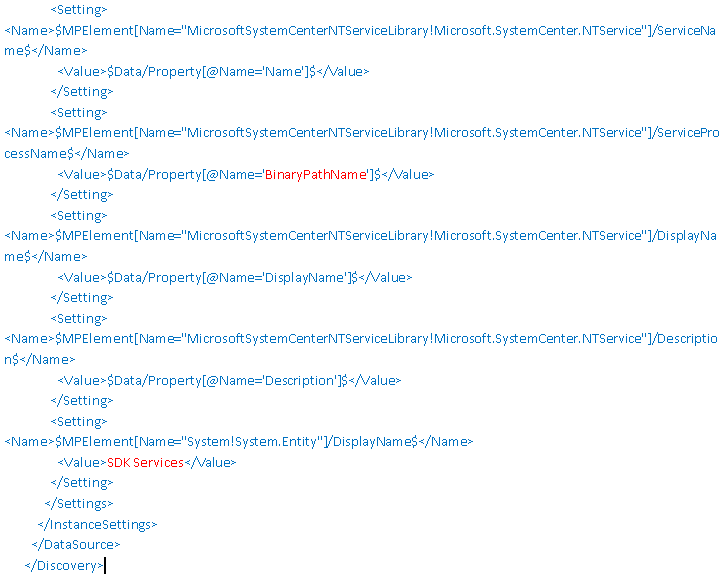
The next red piece was where it said: ‘BinaryPathName’
We replace that by: ‘PathName’
And the third red piece was for the DisplayName and in my case it said: SDK Services
We will replace that by: $Data/Property[@Name=’Name’]$
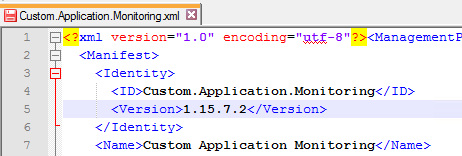
Next I scroll to the top of the code and find the version number and give the last digit a higher number:
Now I found out that the template can also make a strange management pack reference. We are using discovery modules living in the Windows Library and the reference has an alias. We need to change something to make this work. Go to near the top of the management pack code (first 30 lines or so) and you will see a list of references. Look for the one listing the Microsoft.Windows.Library as such:

See the here purple colors alias? We need to copy that alias name (so everyting between the quotes and not including those quotes). Next go to the first block of tekst you replaced.

Now the bit where I put the red line under is a reference, we can recognize it by the ! exclamation mark ! Now replace the part before the exclamation mark (windows) with the alias you had in your reference.

Now it should look like the above, and referencing the reference alias you found in your code.
Next I save the file using the exact same name (do not rename management pack files!). And I go to SCOM Admin pane – Management Packs and I import this management pack from disk.
Now in the SCOM Console go to the Monitoring pane. On the left hand side scroll all the way down until you find “Windows Service and Process Monitoring” and go to the state view called “Windows Service State”. Within minute I saw these 5 services appear and a few minutes later they were in a monitored state as well. The two at the top just happened to be in there already.
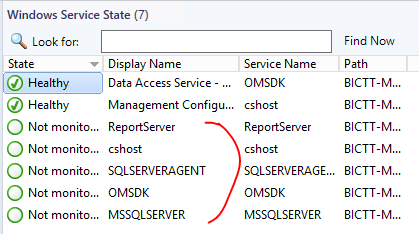
Alright, there we have it! We are now monitoring all windows services – running under a service account with sdk in the name of the account – for both automatic and manual start services – on all machines in a custom group we created.
How to monitor multiple services with a similar name in SCOM
Alright as promissed how to monitor a group of services with a similar display name, such as this example:
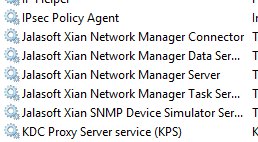
You see the group of Jalasoft services there. I want to find all of them and monitor them all. Well you have seen that we can use wbemtest tool to create a WMI query to get that data. In this case we will filter on the name (this is the displayname as you see it in the screenshot above).
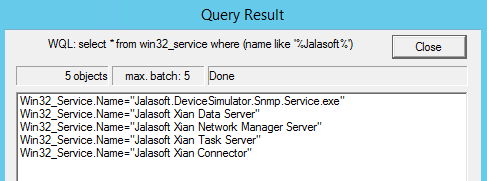
select * from win32_service where (name like ‘%Jalasoft%’)
There is our string and the result while querying WMI for this. Exactly what we want.
Well in the story above we know where the query ended up, so we can just insert this WMI query in the same place to have it monitor all services with Jalasoft in the name.
In this case I want to add this monitoring set to the existing pack I created above. So in short the order of actions:
- Create a Service monitoring template entry and name it Jalasoft Services.
- Store it in the Custom Appllication Monitoring management pack.
- Complete the wizard and put in a recognizable name in the what service to monitor field.
- Export the management pack
- Verify through wbemtest that our WMI query gives the desired result and copy the correct query
- Open up the exported management pack in an XML editor or text editor and find the discovery relating to this in the way shown above and replace the three blocks of code for the three new ones and of course insert the right WMI query.
- Find the management pack reference Alias pointing to Microsoft.Windows.Library and replace the reference in the new code block for that one.
- Raise the number of the management pack version and save the management pack.
- Import the management pack
- Inspect the results in the monitoring pane
And there we go:
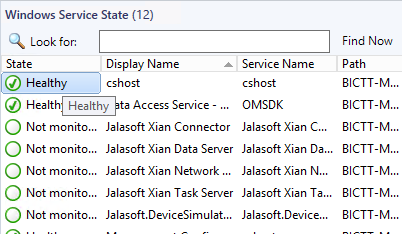
A group of services with something similar in the name, running on a group of servers we defined. Any service with similar name being added to this group of machines will get picked up within a few minutes and be monitored.
Initial Conclusion
SO now we have had the story on how to add either a group of services with a similar name or running under a similar account.
Brian Wren’s post was all we need to cover the second example and also put us on the right path for the first example. I just thought it was time to blog about this in an extensive post to show how this is done and what things we can run into. Also using the SCOM 2012 R2 interface of course and showing the wbemtest interface.
Next on the agenda:
Well I said in the beginning that I wanted these objects placed in a distributed application in SCOM and have it pull in these services automatically. So I will create a simple Distributed Application and I will add all Jalasoft services to it.
Of course this will be in my next post coming very soon!
Bob Cornelissen