
Savision is of course known for its Live Maps software which helps to visualize the health of objects in your SCOM monitoring in a way everybody can understand what is going on. Savision has since a long time also had a Web Console where the dashboards could be viewed through an http(s) connection. From SCOM and other notification tools which add-on to SCOM we are used to pushing alerts towards some IT staff, sometimes based on the source of alerts in relationship to their function within the IT organization for instance. What Savision now adds is a mobile solution to view the overall state of only the maps you are interested in and receiving notifications if such a map changes state. This reduces a lot of alert noise. Currently the mobile apps are available for Android and IOS. The Windows Phone version is still in development and is expected at a later date.
In the article below I will list some lessons learned and of course some features of the product. Pictures are kept large, so we can see whats going on. B)
My environment for this run:
On the backend I am using a single SCOM server version 2012 SP1 UR2 and using Savision Live Maps 2012 version 1.2.1. As my mobile device I used an iPad mini.
Preparations:
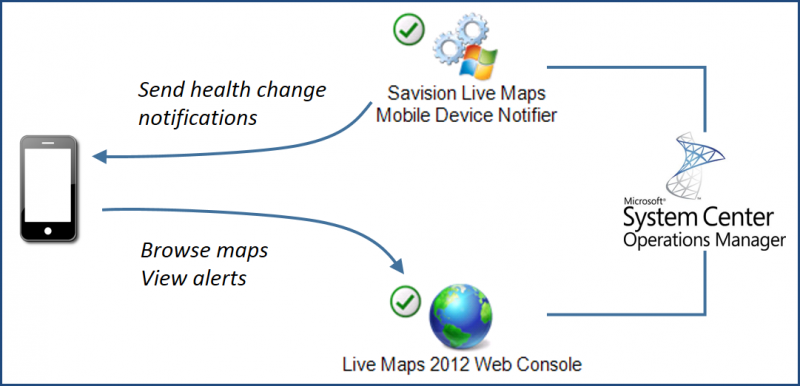
In general, before starting you should read the Savision Installation Guide where the basic installation steps are listed for the server side and client side (the Installation guide can be found on the Savision training center page). Also refer to this article from Savision founder Dennis Rietvink on the mobile access feature with explanations on how it works (http://www.savision.com/resources/blog/mobile-access-system-center-operations-manager). A little further below here I also have an architecture picture which will show the involved components and how they fit together.
Getting the server side working:
I am keeping this part short as it is just following the install guide steps and some additional steps are mentioned.
- When running the full installer of Savision Live Maps 2012 version 1.2.1 we install the Live Maps authoring console, because we need some maps and register the product.
- At the same time I installed all other Savision Live Maps components as well.
- I enter all required information, like pointing the web console to the SCOM Web Console, entering management server details.
- Also at some point the popup comes for the account to use with the mobile access service. This account is used to register mobile devices, so needs SCOM Admin access (I used the SDK account here).
- When configuring the Savision Web Console, make sure you select the Forms based authentication.
- At the end of the procedure be sure to first open up the Authoring Console and register the product with your license key.
- Create some maps (I already had some).
- My Savision Web Console was installed on port 52909 as usual (I did not change that for this environment).
- Open up the SCOM console and in the Monitoring pane go to the Live Maps Mobile folder and select the Mobile Device Notification Service discovered inventory view and it should list the service and be in a green healthy state.
- So what is needed now is to provide access for the mobile devices to access the Savision Web Console URL. So I published this specific web console to a URL on the outside (in my case I did not bother to go with SSL for the temporary environment, but it is advised to do so) and in this case I published it at port TCP 52909 all the same.
- Just make sure the web traffic from mobile device ends up at the Savision Web Console on the correct port. You can test this by using a regular browser on the mobile device or your laptop from the outside and login through the forms based authentication screen and make sure the account you use has access to the maps in the dashboard you are interested in.
- The account used to access Live Maps can be an Operator account for instance, so does not need to be an administrator.
- Also for the notifications to work the server where the mobile device notification service is located must be able to access the internet on port 443 (usually this works already).
This takes care of the three items in the middle and to the right of this architecture picture (copied with permission from Savision blog):
Now let’s get to work on getting the mobile device talking to this backend. 😉
Going to the client side:
Alright, this is where I will start to make it visual for you, as I had some lessons learned here as well. Also some things were specific for my situation and my type of device.
So let’s start by starting up the iPad mini and going to the App Store. Do a search for “Savision”.
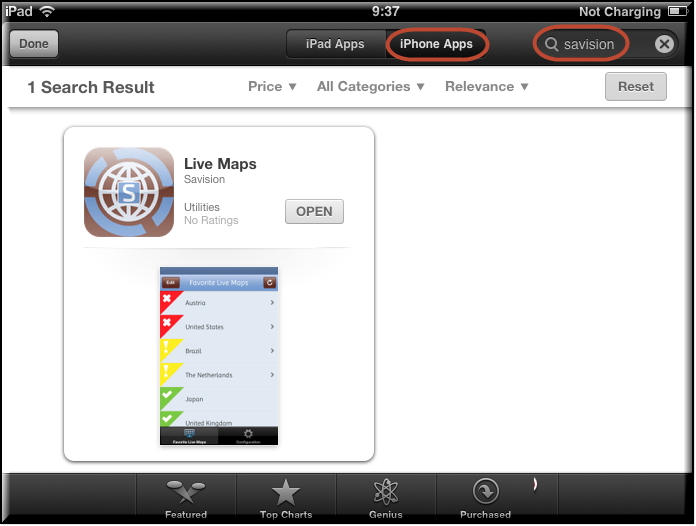
At first it did not find anything, because it was searching specifically for iPad Apps.
💡 Lesson learned: Select the other tab to find the iPhone Apps and there is the Savision Live Maps app. In this picture it is already installed, but if you haven’t got it already just click the Install button.
Next up is the configuration.
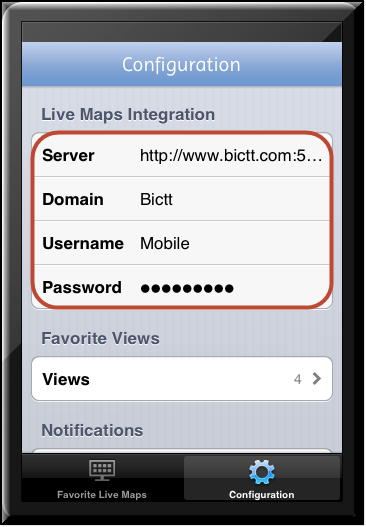
So first enter the server name. Make sure the http or https is correctly used and if you are using the port number, like I did, also include that in the URL. It is the same as what you used in the browser to access the system. Enter the domain name for the user. Enter the user name. Enter the password for this user.
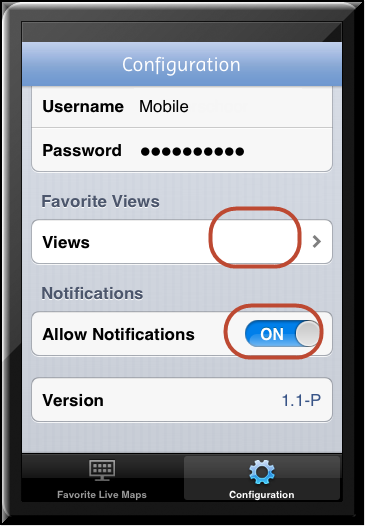
The very next thing to do is to click on the Views line here. At this moment you will see a small popup that the device is being registered. This will run for a few seconds and you will see the Favorites Picker screen (see below). However I want to point out at this moment the Allow Notifications option. By default this is turned off. So turn this on at this step or go back to the configuration after you selected the maps you want to keep an eye on through this app. You can check that a device is registered also from the SCOM side (see even further below, we will get to that later).
💡 However in this case I got an almost immediate error “Couldn’t register”. After researching and trying different situations and options together with Savision Support we found that it was due to an Ampersand sign ( & ) I had in the password for the account I was using first. Savision will list this as a bug and solve this in a future release. So for this specific version, make sure you do not have an ampersand in the password.
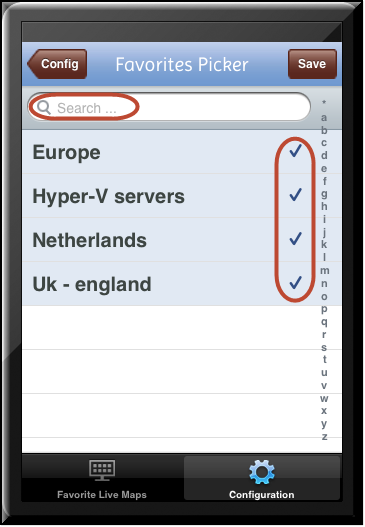
Now we want to be able to select which Live Maps we are interested in. Use the search function to look for the maps. In this case I find 4 maps and tap their names to select them all. Next tap on the Save button.
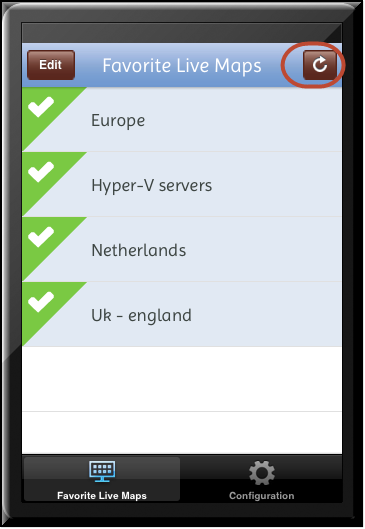
This should be the first result. It should bring the state of the maps you selected to the app. Tap on the refresh button to refresh faster if you are in a rush.
Now let’s get back to the notifications side. When clicking the Configuration button below you can enable the Allow Notifications option. This was shown a few pictures back above.
Lesson learned: At this point I started to break stuff on the SCOM side in order to get a state change of the dashboards and to receive an alert on my mobile device. I did see the state of the maps changing in the application, but I did not see any alerts. It turns out that on the iPad (and iPhone) there is another place to configure how notifications show up on the device. So here goes for the next steps.
On the iPad I went to the general Settings.
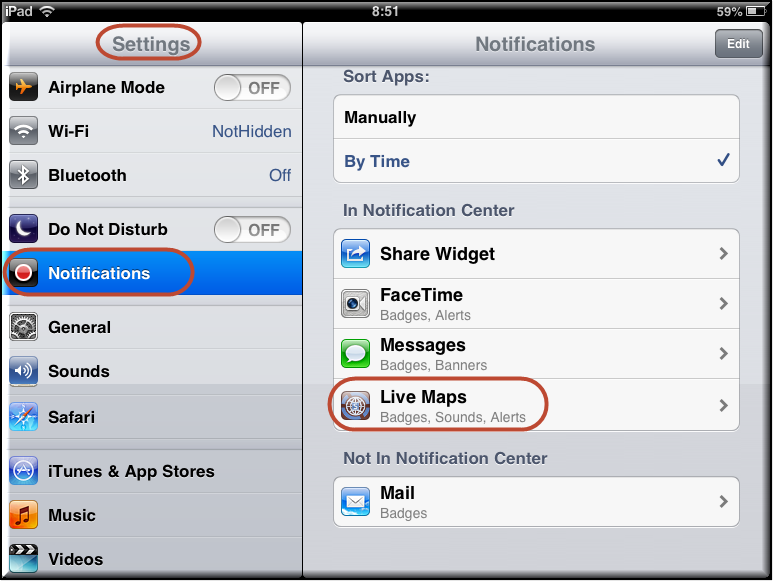
Select the Notifications tab and find the Live Maps entry on the right hand side.
💡 Lesson learned: In my case there was no Live Maps entry here. And disabling and enabling notifications in the Live Maps app did not help. Together with Savision Support we actually found out there is a bug where this can occasionally happen (in their case also on an iPhone). They will fix this in a future version update. I found the workaround is to remove the app completely from your device and to re-install it again.
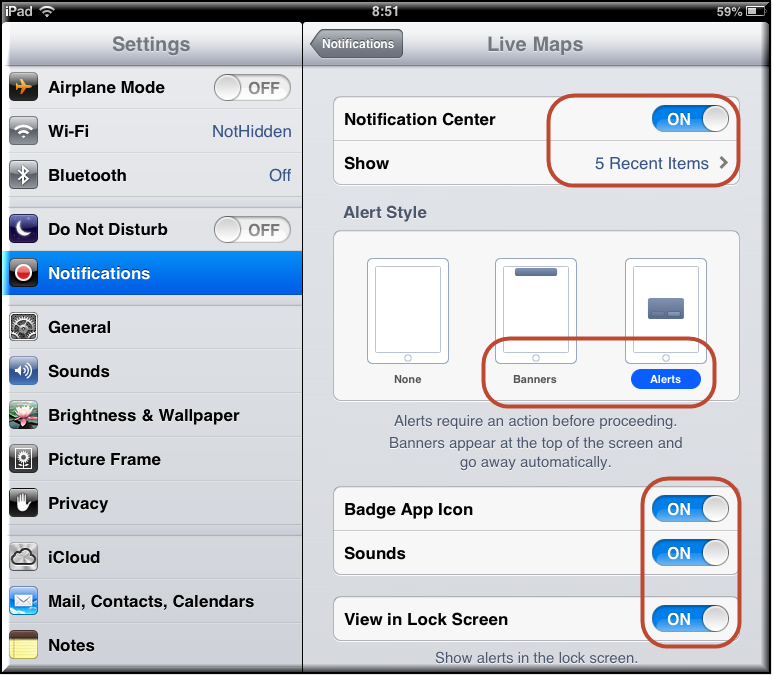
Normally selecting the Live Maps entry in the notifications area should bring you to this screen. Here you can select several options for the alerts, like the style etc. These are the options I used in this case.
At this point I first made the maps I am interested in green again and made sure the app also saw this change. Let’s try to break stuff again. I have a monitor on a machine in my environment which will go red and fire an alert, because of an issue I have been too lazy to fix for the moment, so I can reset its health to make stuff green again and within a short time it will turn red again. So leave the iPad and wait for a number of minutes.
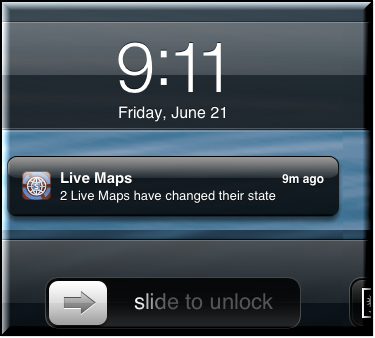
There we go. Yes I cropped the image a lot, but you can see the notification in the middle. If I unlock the screen and on the iPad I sweep from the top down there is also another notification screen where I can see stuff:
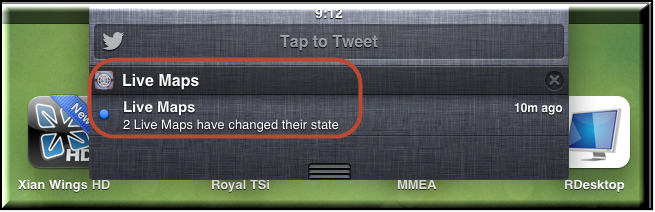
Yes there are also other icons there I will discuss at a later time. Let’s focus on this one first!
So open up the Live Maps app from the notifications area or just open the app.
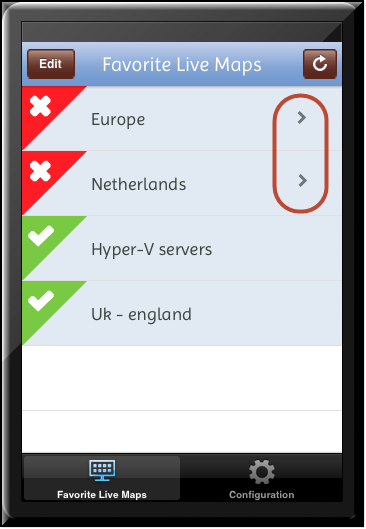
Refresh the screen if it doesn’t display the changes yet (It will do that, its just not polling every second… 🙄 ). Here we can see two maps have gone red. Actually in this case the Netherlands map is nested into the Europe map. We can see there are arrows, where we can move into more details as for the alerts available (remember that a health state change doesn’t require an alert to be there, although in many cases there is). This is an important thing actually to notice. As long as the health state changes it will show up here and you know something is going on, even if an alert was not created or if somebody manually closed the alert without fixing the problem. It happens.
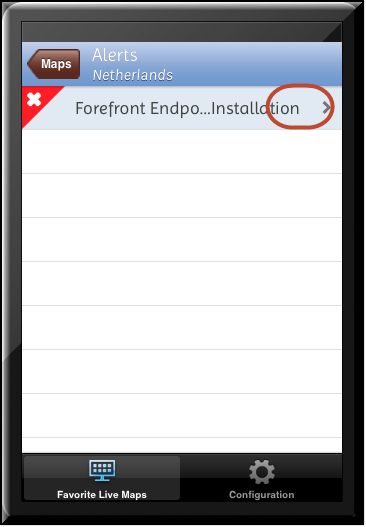
In any case the alerts belonging to this map are now retrieved. This can take a few additional seconds, so don’t panic right away. Here is the list of alerts we have. Only one in my case. Let’s tap on it and move into the details of it.
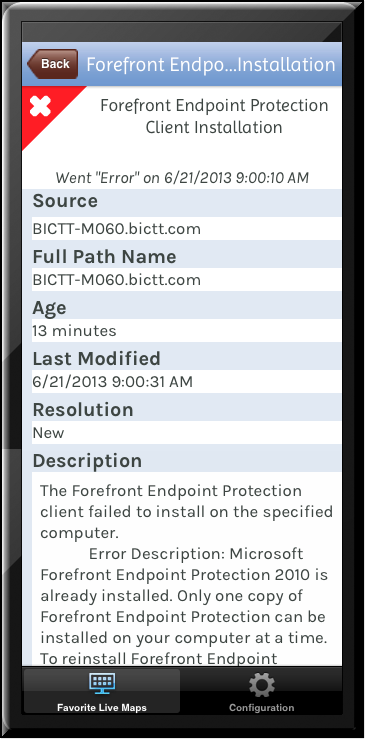
Here is the alert. I did join two screens together here which makes the screenshot longer, but it has a scroll bar normally.
Yes this server happens to have a Forefront 2010 client on it and it has a job which tries to push the SCEP 2012 client without first removing the old software. It doesn’t like that. Will fix that later.
So, now as promised what does this look like from the SCOM side?
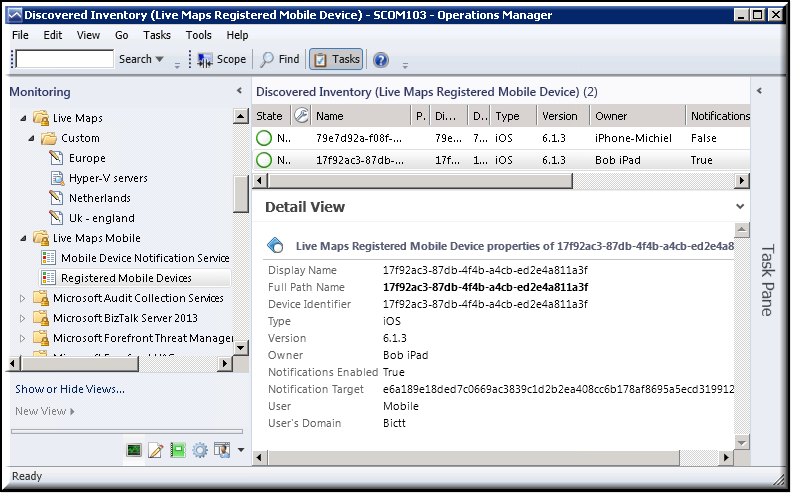
I have touched upon the discovered inventory view right above this one which lists the state of the Mobile Device Notification Service. It was green. Nothing more to see there. What we are seeing in this discovered inventory view, with name Registered Mobile Devices, are the devices registered through that Live Maps app on mobile devices. My buddy Michiel from Savision Support was connected and my own iPad is listed here. We can see the type of device and version and the owner name (as entered in the device). Also we can see that this device has Notifications Enabled (while the one from Michiel has not). Also it lists the user and domain used to connect, which you entered in the configuration of the mobile app on your mobile device. And just to show you on the left hand side you can see the 4 Live Maps I used in this case, both dashboard and list type maps.
One nice feature from an admin perspective is that you can actually see which maps are in the users list by right clicking this device in this view and opening a Diagram View. It will list the maps the user selected there.
Conclusion:
I like the idea of this mobile app and I also like the idea of making it very easy to use. Also it shows me only the alerts and health states I am interested in. Even if there are no alerts configured for a certain health state change which impacts my applications nonetheless. It notifies you if the state of one or more of the maps changes.
In general I use Live Maps to create overall dashboards to use in the NOC and helpdesk and for managers to look at. These are always multi layered dashboards where you can zoom into maps/lists/dashboards one or more levels underneath which reflect specific services or applications or distributed applications. Some IT staff only needs to be notified about a limited set of these IT services and this mobile access also gives the possibility of only selecting those maps and be notified only for those and find related alerts for only these services.
A very nice product and addition to your toolset!
Note:
The Mobile access feature is part of the Enterprise license of Live Maps 2012. However if you run Standard and still want to be able to use this feature without upgrading to the Enterprise version, because you have no use for the rest of the Enterprise features (such as Bing Maps integration and SC Service Manager integration), just send me an email.
Note 2:
BICTT is a long time Gold Partner of Savision and always deeply involved in feature requests, testing, troubleshooting, promoting and teasing the people at Savision.
Note 3:
Much thanks to Michiel Rens from Savision Support for working through some tests with me. Thanks to Dennis Rietvink for letting me use his architecture picture. And thanks to Savision for creating great stuff and always taking and giving direct feedback and applying it into their products!
Happy monitoring!
Bob Cornelissen