
Microsoft System Center Operations Manager (SCOM) has been around for many years as you all know. In most cases this runs in a datacenter and monitors your datacenter resources, such as infrastructure, servers and applications. The last few years more companies have been adopting cloud and hybrid workloads as well as datacenter workloads. We have seen that monitoring also was becoming more of a hybrid, with companies monitoring cloud resources with SCOM, but also using Azure Monitor with Log Analytics to monitor on-premises resources. We have also seen some companies move a resource such as SCOM into the cloud by using IaaS and deploying full VM’s.
A few years ago, Microsoft was heard discussing the possibility of creating a SCOM in the cloud with code name Aquila. The idea was that SCOM would run in the Azure cloud, with the backend provided by Microsoft services and the user having the agents in datacenters and wherever there are IaaS VM’s for example. And there would be integration with the Azure Portal for parts of this story. But we did not know more about it, and we especially did not hear anything more about it in general. I was on the inside track for this story, but due to NDA, I could not talk about it in public.
In the past months there has been a private preview running of what is now called SCOM Managed Instance. This is the new name for Aquila. We will see the new name replacing the old name everywhere now.
This week we are seeing a public preview release of SCOM Managed Instance. The documentation will be online as it is being released. This will contain information about how to install the prerequisites and so on.
Goals
The main goals of SCOM MI or SCOM Managed Instance are to have flexibility in creating monitoring by simplifying its deployment and management for the SCOM Backend components, while preserving the monitoring investments through management packs and tuning and so on. SCOM MI can also scale, when you get more agents connected and deploy additional management servers in your instance as required if you choose to scale-out.
The SCOM MI design and install video
I have created a video discussing the prerequisites, a quick design of components for a small demo, and the installation steps for SCOM Managed Instance and it is published here.
This was recorded right before the public preview, and we actually did find one small issue while deploying it while doing something different. During this weekend (2 days later) I got a message to try this specific scenario again, because it has been found, analyzed, fixed and moved into the release already. In the weekend. That is quick DevOps at work from the Product Team, kudos.
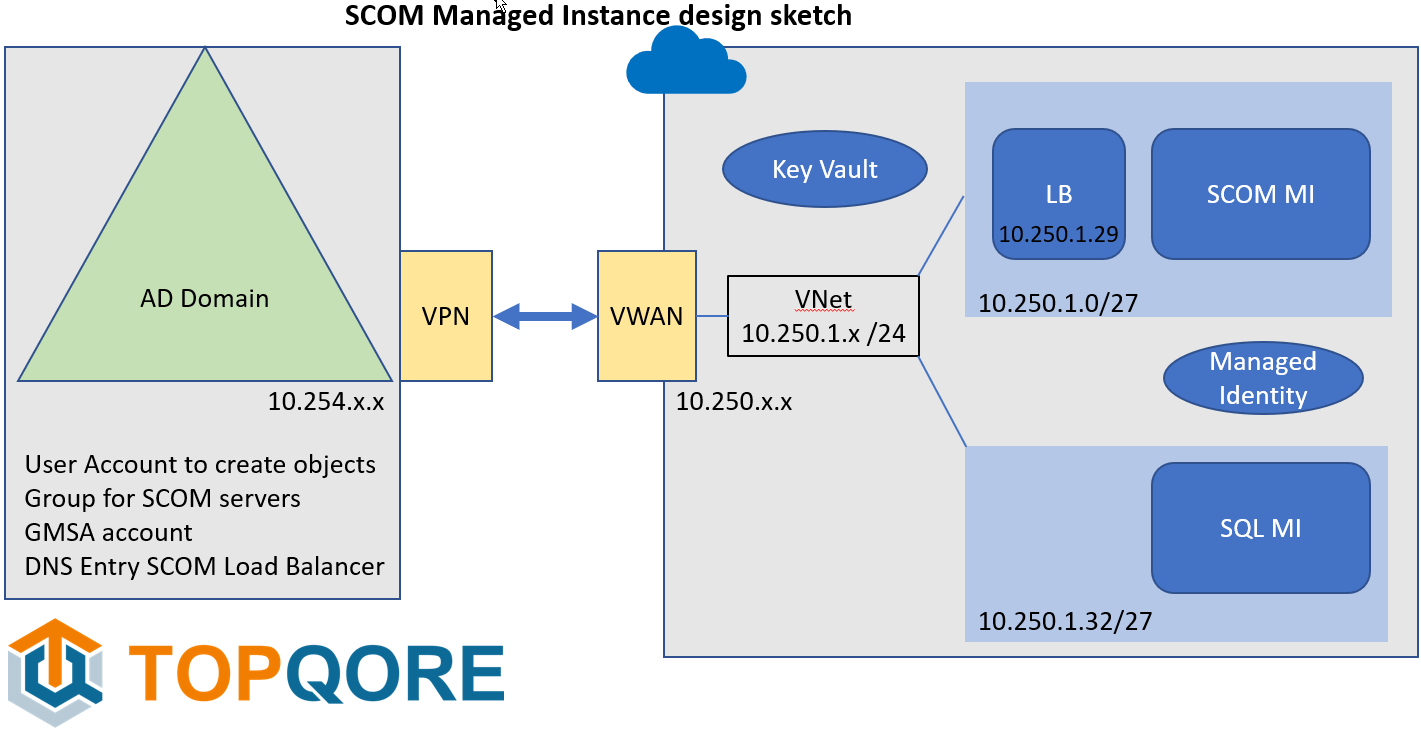
Design:
In the video I first start out with the initial design. It is mainly about seeing the components needed and next building the story up. This is a sketch of our demo design for SCOM Managed Instance:
Prerequisites
Now that the documentation is online, there is a list of SCOM MI prerequisites found on this page, but keep an eye on the part where there are 3 tabs containing prerequisites on the same page. Be sure to click all 3 of them.
The first thing needed is a line-of-sight VPN (this can be a VPN or ExpressRoute). This is because we are going to join the SCOM management server to the domain and use domain-based service accounts. So, we need to be able to talk in both directions. Arrange routing and so on and firewalls. Every company is different, and may looking into running a SCOM in the cloud have already created connectivity to the cloud.
We need to have an On-Prem domain to join to in this case. We created there:
- A user account which will be used to run some SCOM services and join the SCOM server to the domain and it is our first SCOM Admin.
- We create a global security group where the SCOM servers will end up in. The first user account is the manager of this group (Managed By). SO it can adjust group membership.
- We create a GMSA (Group Managed Service Account) and give the created group rights to read the account details. This is going to be used to run the Data Access service.
- And we create an entry in DNS pointing to the Load Balancer address for SCOM Managed Instance. So, we do need to know which IP subnet we are going to use for SCOM MI and which IP address in it.
Now, in the cloud we have a VNet, and some subnets created. We prepare by creating a SQL MI (SQL Managed Instance), in its own subnet. It takes about a /27 subnet with 32 addresses.
We create a Managed Identity, and assign it rights on the SQL MI side.
We need a Key Vault to store the credentials in for the first service account we are going to use to connect SCOM to the domain.
And next is the SCOM MI. We created another /27 subnet for it to live in and had chosen an IP address for the load balancer address. This is the name and address the agents and SCOM consoles are going to use to connect to SCOM.
And now SCOM MI install
And next we run through the SCOM MI setup! I did a run through in the attached video. Once all the components are in place, it is easy to get that step done.
After that you can go into SCOM Managed Instances from the Azure Portal, and you will find several ways to connect. There is currently a full VM you can access with RDP behind it (if needed for a specific thing). Of course, in the end it is a goal to not have to login to the SCOM management server anymore, but we are not at that stage yet. And more importantly, there is a Connect SCOM Console or Web Console option now. It will download an installer file to your machine.
When you run this installer, it will give you two options. To install the SCOM Console, or the SCOM Web Server (or both). For the web server, you do need to install IIS and so on. But selecting the SCOM Console option is easy as always.
You will see there are no report server prerequisites to install first, because for SCOM Managed Instance, we are moving away from SSRS Reporting and moving into PowerBi reporting. This is a separate topic for the near future, but you will notice quickly enough that this green button is no longer there in the SCOM Console.
By the way, once you connect, you need to make sure you are first setting the SCOM Admin rights. Check wat you need. Leave the SCOM service account you had there of course, add your SCOM Admins group from AD, maybe add the gmsa account. And see if you can now remove the things which are no longer needed. Next, you can start setting up the rights for the other roles.
Also, you can now set the security settings for manually added SCOM agents to Review in pending management.
Now, you can multi-home a current agent to this instance. Or install an agent and point it to the load balancer DNS name you created.
Note: We are in December 2022 entering the public preview phase. This means there will be some challenges still open. And it is a phase where things will change going forward to the full production phase of version 1. More documentation is being created and published as well.
Conclusion
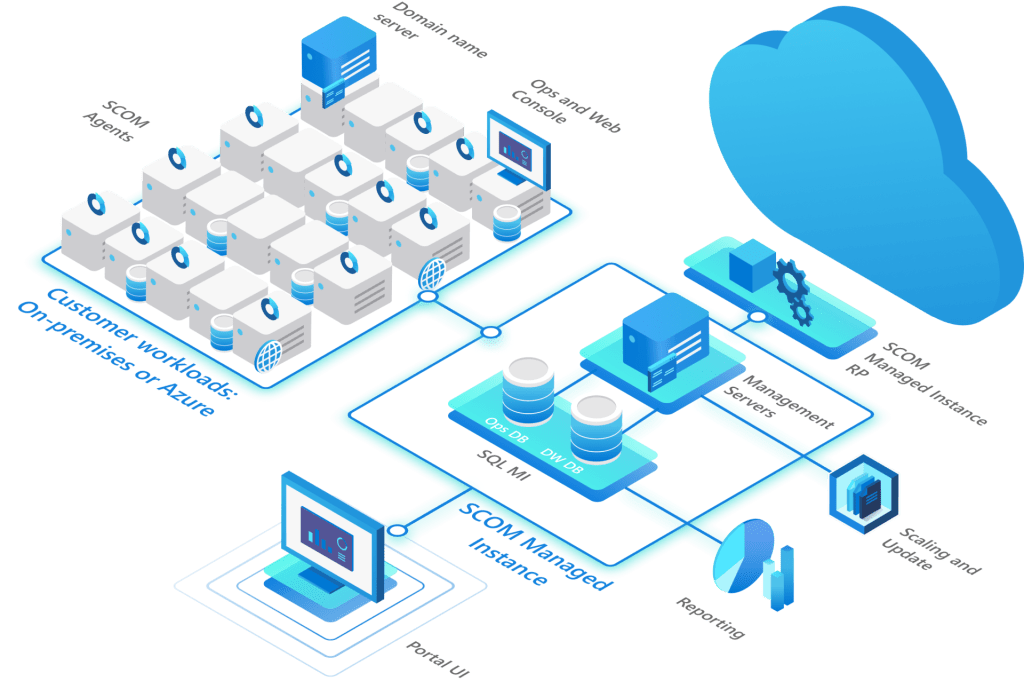
This is a move to be able to run SCOM in the cloud as a cloud service. As a managed instance, where Microsoft will help to maintain the product bits and be able to provide updates in smaller increments. We will do the management packs and agents as customers. The amount of regular work on the backend systems for SCOM though is going to be less. We do need to take care of the monitoring configuration, which are management packs and overrides and dashboards and so on, and of course the agents. It is a step in the cloud direction for running and maintaining the backend services an becoming predictable in costs and the work you need to do on the backend systems, while maintaining the vast wealth of monitoring knowledge stored in management packs, which are part of SCOM. I am looking forward to working with some of you on this!
We wish you happy monitoring and feel free to connect with us about this subject.
On behalf of TopQore, Bob Cornelissen